Drupal Custom Module Development. A Brief Tutorial
Most additional features in Drupal are delivered in the form of modules. They are made by Drupal developers for the community. Programmers are also responsible for creating Drupal custom modules. What do you need to create a custom module in Drupal? What does the process look like?

What is a Drupal Module?
What is a Drupal Module?
Drupal modules are code fragments that expand the existing features or create new ones. There are predefined modules in the Drupal core such as Node, Views, Media etc.
Drupal modules can be divided into three categories:
- Core – installed directly with Drupal CMS. Some are installed by default, such as the aforementioned Node or Views, and some can be installed and configured manually, like the Forum module for example.
- Contrib – non-profit modules that are created by the community. Available for everyone.
- Custom – modules created by developers to fit a given project. They can be used to develop your own plugins, such as field types, and APIs, or migrate data from other databases or systems.
What is Drupal Custom Module Development?
What is Drupal Custom Module Development?
Custom Drupal modules are created to fit a particular project. These solutions are not available by default in Drupal CMS and are not created by the community. They might have some core Drupal features or be completely independent, for example, integrating with other systems. However, custom Drupal development means updating the module and maintaining it even against newer system versions and programming languages.
Custom Drupal Module Development Step-by-Step
Custom Drupal Module Development Step-by-Step
Here is the to-do list that should make creating a Drupal module easier. We suggest doing it step-by-step to consolidate the knowledge.
Name Your Module
First things first. Start by creating a name for your Drupal custom module. Modules can be created in two ways:
- manually, by creating the files responsible for the module definition,
- by the Drush tool, used for managing the Drupal project from the command line.
Let’s take a look at the module naming requirements in Drupal. Short name (machine name), must:
- start from a letter,
- contain small letters, digits and “_” characters,
- be unique,
- contain no more than 50 characters.
Moreover, it should not be any of the reserved terms for classic Drupal catalogues such as src, assets, templates etc. Short names should not include the names of already existing modules, even if you do not use them, Views for example. Drupal may confuse the modules.
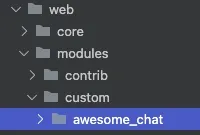
Let’s name our training module “awesome_chat”. To do it manually, you should create a new catalogue in the path web/modules/custom:

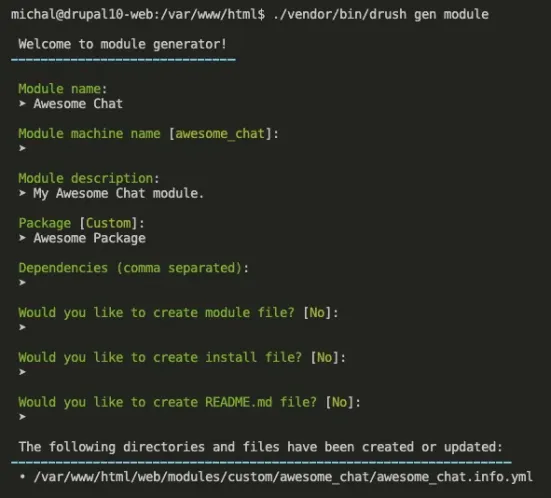
When using Drush, use the “./vendor/bin/drush gen module” command and fill in the required fields:

In this case, we provided:
- module name – it is displayed in the admin panel,
- module machine name – it is the same as the catalogue name,
- module description – it is displayed in the admin panel,
- package group – in which section of packages/modules in the admin panel your module should be located – we created our own group called “Awesome Package”,
- dependencies – if you use various modules (doesn’t matter if they are core, contrib or custom), you should list them here,
- answers whether you want to create specific files for the module. Every answer is a “no” because you don’t need them at this stage.
Inform Drupal That Your Module Exists
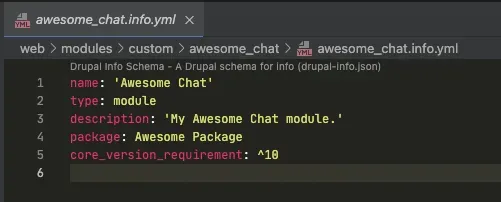
In order to install custom modules in Drupal, they should first be visible for the system. As you can see while generating the module with Drush, an “awesome_chat.info.yml” file has been created. It makes the module visible and defines some of its features at the same time. Let’s see what has changed:

There are two additional values that have been added:
- type – defines the type of functionality. In our case it’s “module”, but if it was a custom Drupal theme, the value would be called “theme”
- core_version_requirement – specifies the Drupal version for which the module is available. “^10” indicates that the custom module in Drupal can be installed for versions 10 and earlier. If the module was available for versions 10 and 11 (it is going to be released in 2024), you would type “^10 || ^11”.
You can define even more precise values, such as the PHP version, life circle, test dependencies and the main configuration form. Find out more on the Drupal’s official website.
Is That All?
We finished creating the module. That is enough to generate custom modules in Drupal. This is just a beginning, though. Drupal module development requires some further work. Find out, what you can take advantage of to write your own functionality.
Libraries, Permissions, Action and Menu Files
In the module, you can create files that introduce functionalities to existing solutions in Drupal:
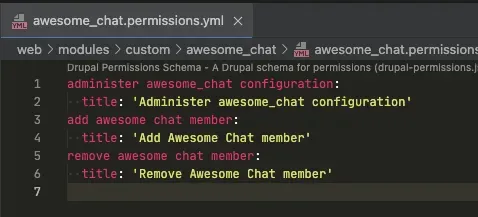
- awesome_chat.permissions.yml (*.permissions.yml) – allows you to define permissions for specific operations that will be included in the module code. Permission names are the keys, while the titles are displayed in the admin panel,

- awesome_chat.module (*.module) – responsible for using hooks, that connect to other functionalities. You can find theme definitions and helper functions there,
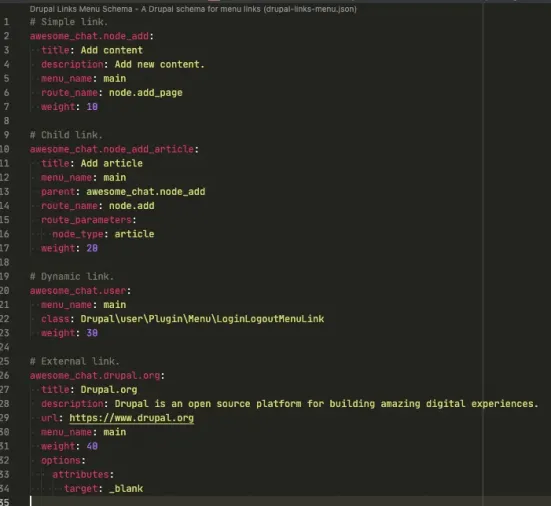
- awesome_chat.links.menu.yml (*.links.menu.yml) - allows you to add a new tab to the admin menu. There are several ways to do it. Let’s take a look at the file created in Drush:

- awesome_chat.install (*.install) – here you can define the hook responsible for module requirements (hook_requirements()) and hooks that update or perform actions on the database,
- awesome_chat.api.php (*.api.php) – you can define your own hooks here, thanks to which you can plug in custom functions written in Drupal.
Controller Creation
To create a controller in the module, you can use the command “./vendor/bin/drush gen controller” in Drush. After completing the information regarding the controller’s name and data path, you are provided with two files:
- web/modules/custom/awesome_chat/awesome_chat.routing.yml
awesome_chat.first_route:
  path: '/awesome-chat'
  defaults:
    _controller: '\Drupal\awesome_chat\Controller\AwesomeChatController::chat
    _title: 'Awesome chat!!!'
  requirements:
    _permission: 'access content'
In the *.routing.yml file you define paths to the controllers and set up appropriate parameters. In the code, you stated that the path “awesome_chat.first_route” indicates a specific method “chat” from the controller and it contains a title entered in the _title parameter. All roles with the “access content” feature have access to it. A detailed description of routing functioning can be found on Drupal’s official website.
- web/modules/custom/awesome_chat/src/Controller/AwesomeChatController.php
<?php

namespace Drupal\awesome_chat\Controller;

use Drupal\Core\Controller\ControllerBase;

class AwesomeChatController extends ControllerBase {

  public function chat() {
    return [
      '#markup' => $this->t('Hello from Awesome Chat!!'),
    ];
  }
}
As you can see, by clicking /awesome-chat, a new site is opening with the “chat” method: “Hello from Awesome Chat!!”.
Installation Process
After creating a module and defining the functionalities, you can install it. The installation process can be held from the admin panel by going to /admin/modules, selecting a standard module and starting the installation. It can also be done with the „./vendor/bin/drush en awesome_chat” command.
Summary
Summary
Custom modules are no longer a secret for you. You learned how to create a module in Drupal as well as got to know the module development. Custom modules allow for personalizing and expanding the functionalities. Thanks to that, the system you are creating is more flexible. Building a module might be complicated, but it gives you the ability to fully control the website.
Developing a module for Drupal requires rethinking the strategy and responsible implementation. If you want to expand your project with new functionalities, contact the experts to ensure the project’s success.
